以目标检测算法YOLOX为例,记录模型从权重文件转换为ONNX,再使用TIDL(Importer/Tools)编译为可执行文件,最后于SK板运行及评估的开发流程。
接上一篇:TDA4②:环境搭建、模型转换、Demo及Tools TDA4④:部署自定义深度学习模型
YOLOX部署TDA4VM-SK流程 TI官方在 ModelZOO 中提供了一系列预训练模型可以直接拿来转换,也提供了 edgeai-YOLOv5 与 edgeai-YOLOX 等优化的开源项目,可以直接下载提供的YOLOX_s的 onnx文件 和 prototxt文件 ,也可以在官方项目上训练自己的模型后再导入。
这里尝试跑通全流程,在 edgeai-YOLOX 项目中训练,得到 .pth 权重文件,使用 export_onnx.py 文件转换为 .onnx 模型文件和 .prototxt 架构配置文件,并导入TIDL,得到部署用的 .bin 文件。 edgeai-YOLOX文档 以及 YOLOX模型训练结果导入及平台移植应用
1. 使用edgeai-yolox训练模型 目标检测文档:edgeai-yolox-2d_od
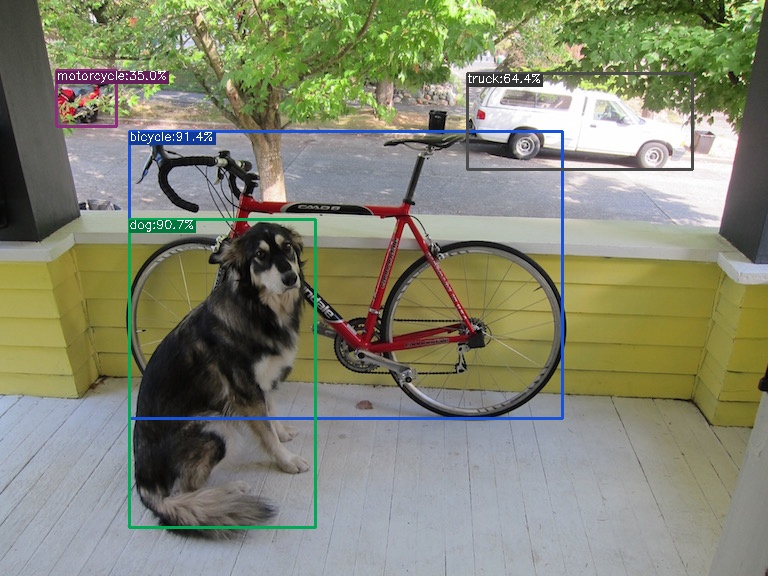
1
2
3
4
5
6
7
8
9
10
11
12
13
14
15
16
17
18
19
20
21
22
23
24
25
26
27
28
29
30
31
git clone https://github.com/TexasInstruments/edgeai-yolox.git conda create -n pytorch python=3.6 ./setup.sh python tools/demo.py image -f exps/default/yolox_s_ti_lite.py -c yolox-s-ti.pth --path assets/dog.jpg --conf 0.25 --nms 0.45 --tsize 640 --save_result --device gpu --dataset coco COCO ├── train2017 ├── val2017 └── annotations ├── instances_train2017.json └── instances_val2017.json yolox/data/datasets/coco_classes.py yolox/data/datasets/coco.py yolox/exp/yolox_base.py exps/default/yolox_s_ti_lite.py python -m yolox.tools.train -n yolox-s-ti-lite -d 0 -b 16 --fp16 -o --cache python3 tools/export_onnx.py --output-name yolox_s_ti_lite0.onnx -f exps/default/yolox_s_ti_lite.py -c YOLOX_outputs/yolox_s_ti_lite/best_ckpt.pth --export-det python3 demo/ONNXRuntime/onnx_inference.py -m yolox_s_ti_lite0.onnx -i test.jpg -s 0.3 --input_shape 640,640 --export-det
2. 模型文件转ONNX ONNX(Open Neural Network Exchange)是用于在各种深度学习训练和推理框架转 换的一个中间表示格式。ONNX 定义了一组和环境,平台均无关的标准格式,来增强各种 AI 模型的可交互性,开放性较强。 TIDL 对 ONNX 模型有很好的支持,因此,将训练得到的pth模型文件转换为onnx文件,并利用tidl importer实现模型的编译与量化,具体步骤如下:
pycharm进入edgeai-yolox项目,根据提示额外安装requirements marketplace 下好拖到扩展位置)拓展设置中把Python Default Path改成创建的环境 /home/wyj/anaconda3/envs/pytorch/bin/python,最后用vscode打开项目,F5运行py程序,将.pth转为 .onnx, .prototxt 文件。
1
2
3
4
5
6
7
8
9
10
11
12
13
14
15
pip3 install -U pip && pip3 install -r requirements.txt pip3 install -v -e . pip3 install cython pip3 install 'git+https://github.com/cocodataset/cocoapi.git#subdirectory=PythonAPI' python3 tools/export_onnx.py --output-name yolox_s_ti_lite.onnx -f exps/default/yolox_s_ti_lite.py -c yolox-s-ti-lite.pth TypeError: Descriptors cannot not be created directly. > pip install protobuf==3.19.6; AttributeError: module 'numpy' has no attribute 'object' . > pip install numpy==1.23.4 __main__:main:245 - generated onnx model named yolox_s_ti_lite.onnx __main__:main:261 - generated simplified onnx model named yolox_s_ti_lite.onnx __main__:main:264 - generated prototxt yolox_s_ti_lite.prototxt
yolox_s_ti_lite.prototxt
1
2
3
4
5
6
7
8
9
10
11
12
13
14
15
16
17
18
19
20
21
22
23
24
25
26
27
28
name: "yolox" tidl_yolo { yolo_param { input: "/head/Concat_output_0" anchor_width: 8.0 anchor_height: 8.0} yolo_param { input: "/head/Concat_3_output_0" anchor_width: 16.0 anchor_height: 16.0} yolo_param { input: "/head/Concat_6_output_0" anchor_width: 32.0 anchor_height: 32.0} detection_output_param { num_classes: 80 share_location: true background_label_id: -1 nms_param { nms_threshold: 0.4 top_k: 500} code_type: CODE_TYPE_YOLO_X keep_top_k: 200 confidence_threshold: 0.4} name: "yolox" in_width: 640 in_height: 640 output: "detections" }
ONNXRuntime inference
1
2
3
cd <YOLOX_HOME>python3 demo/ONNXRuntime/onnx_inference.py -m yolox_s_ti_lite.onnx -i assets/dog.jpg -o output -s 0.3 --input_shape 640,640
3. 使用TIDL转换模型 本节使用了两种不同的方法完成PC端TIDL的编译运行:
TIDL Importer: 使用RTOS SDK中提供的导入工具,提供了很多例程(8.6中没有,copy 8.5的),方便快捷;
TIDL Tools:TI提供的工具,见github edgeai-tidl-tools ,或在RTOS SDK也内置了,灵活度高,不支持的算子分配到ARM核,支持的会使用TIDL加速运行,增加了深度学习模型开发和运行的效率。但要求平台有onnx运行环境
模型文件配置:拷贝 .onnx, .prototxt 文件至/ti_dl/test/testvecs/models/public/onnx/,yolox_s_ti_lite.prototxt 中改in_width&height,根据情况改nms_threshold: 0.4,confidence_threshold: 0.4
编写转换配置文件:在/testvecs/config/import/public/onnx下新建(或复制参考目录下yolov3例程)tidl_import_yolox_s.txt ,参数配置见文档 , 元架构类型见 Object detection meta architectures ,inData处修改自定义的数据输入
转换配置文件tidl_import_yolox_s.txt
1
2
3
4
5
6
7
8
9
10
11
12
13
14
15
16
17
18
19
20
21
22
modelType = 2 numParamBits = 8 numFeatureBits = 8 quantizationStyle = 3 inputNetFile = "../../test/testvecs/models/public/onnx/yolox-s-ti-lite.onnx" outputNetFile = "../../test/testvecs/config/tidl_models/onnx/yolo/tidl_net_yolox_s.bin" outputParamsFile = "../../test/testvecs/config/tidl_models/onnx/yolo/tidl_io_yolox_s_" inDataNorm = 1 inMean = 0 0 0 inScale = 1.0 1.0 1.0 inDataFormat = 1 inWidth = 1024 inHeight = 512 inNumChannels = 3 numFrames = 1 inData = "../../test/testvecs/config/detection_list.txt" perfSimConfig = ../../test/testvecs/config/import/device_config.cfg inElementType = 0 metaArchType = 6 metaLayersNamesList = "../../test/models/pubilc/onnx/yolox_s_ti_lite.prototxt" postProcType = 2 debugTraceLevel = 1
模型导入.bin
1
2
3
4
5
6
7
8
9
10
11
12
cd ${TIDL_INSTALL_PATH} /ti_dl/utils/tidlModelImport./out/tidl_model_import.out ${TIDL_INSTALL_PATH} /ti_dl/test/testvecs/config/import/public/onnx/tidl_import_yolox.txt tidl_net_yolox_s.bin tidl_io_yolox_s_1.bin tidl_net_yolox_s.bin.svg tidl_out.png, tidl_out.txt Step != 1 is NOT supported for Slice Operator -- /backbone/backbone/stem/Slice_3
TIDL运行(PC inference)
1 2 3 4 5 6 7 8 9 10 11 12 13 14 15 16 17 18 19 1 testvecs/config/infer/public/onnx/tidl_infer_yolox.txt 0 inFileFormat = 2 numFrames = 1 netBinFile = "testvecs/config/tidl_models/onnx/yolo/tidl_net_yolox_s.bin" ioConfigFile = "testvecs/config/tidl_models/onnx/yolo/tidl_io_yolox_s_1.bin" inData = testvecs/config/detection_list.txt outData = testvecs/output/tidl_yolox_od.bin inResizeMode = 0 debugTraceLevel = 0 writeTraceLevel = 0 postProcType = 2 cd ${TIDL_INSTALL_PATH} /ti_dl/test./PC_dsp_test_dl_algo.out
参考他人实例:YOLOX-Yoga Edge AI Studio > Model Analyzer > Custom models > ONNX runtime > custom-model-onnx.ipynb例程, 并结合 OD.ipynb 例程进行修改
YOLOX.ipynb
1
2
3
4
5
6
7
8
9
import osimport tqdmimport cv2import numpy as npimport onnxruntime as rtfrom PIL import Imageimport matplotlib.pyplot as pltfrom scripts.utils import imagenet_class_to_name, download_model, loggerWritter, get_svg_path, get_preproc_props, single_img_visualise, det_box_overlay
其中scripts.utils中的代码细节在/notebooks/scripts/utils.py
1 2 3 4 5 6 7 8 9 10 11 12 def preprocess (image_path ): img = cv2.imread(image_path) print ('原始图像:' , img.shape, img.dtype) img = cv2.resize(img, (640 , 640 ), interpolation=cv2.INTER_CUBIC) img = cv2.cvtColor(img, cv2.COLOR_BGR2RGB) img = img.astype('float32' ) / 255.0 img = (img * 255 ).astype('uint8' ) img = np.expand_dims(img, axis=0 ) img = np.transpose(img, (0 , 3 , 1 , 2 )) print ('处理后的图像:' , img.shape, img.dtype) return img
图片的预处理十分重要,调试时注意print图片数据,避免处理出错
1 2 3 4 5 6 7 8 9 10 11 12 13 14 15 16 17 18 19 20 21 22 23 24 25 26 images = [ 'WYJ/dog.jpg' ,] output_dir = 'WYJ/output' onnx_model_path = 'WYJ/yolox_s_lite_640x640_20220221_model.onnx' prototxt_path = 'WYJ/yolox_s_lite_640x640_20220221_model.prototxt' with loggerWritter("WYJ/logs" ): compile_options = { 'tidl_tools_path' : os.environ['TIDL_TOOLS_PATH' ], 'artifacts_folder' : output_dir, 'tensor_bits' : 8 , 'accuracy_level' : 1 , 'advanced_options:calibration_frames' : len (images), 'advanced_options:calibration_iterations' : 3 , 'debug_level' : 1 , 'object_detection:meta_arch_type' : 6 , 'object_detection:meta_layers_names_list' : prototxt_path, } os.makedirs(output_dir, exist_ok=True ) for root, dirs, files in os.walk(output_dir, topdown=False ): [os.remove(os.path.join(root, f)) for f in files] [os.rmdir(os.path.join(root, d)) for d in dirs]
object_detection:meta_arch_type、meta_layers_names_list两个参数在OD任务中必须配置,否则内核直接奔溃,参数配置文档中也有说明:object-detection-model-specific-options
1 2 3 4 5 6 7 8 9 10 11 12 13 14 15 16 17 18 so = rt.SessionOptions() EP_list = ['TIDLCompilationProvider' ,'CPUExecutionProvider' ] sess = rt.InferenceSession(onnx_model_path ,providers=EP_list, provider_options=[compile_options, {}], sess_options=so) input_details = sess.get_inputs() print ("Model input details:" )for i in input_details: print (i) output_details = sess.get_outputs() print ("Model output details:" )for i in output_details: print (i) for i in tqdm.trange(len (images)): processed_image = preprocess(images[i]) output=None output = list (sess.run(None , {input_details[0 ].name :processed_image }))
打印输入输出信息,运行编译
1 2 3 4 5 6 7 8 9 10 11 12 13 14 15 16 17 18 19 from PIL import Image, ImageDrawimg = Image.open ("WYJ/dog.jpg" ) width_scale = 640 / img.size[0 ] height_scale = 640 / img.size[1 ] draw = ImageDraw.Draw(img) for i in range (int (output[0 ][0 ][0 ].shape[0 ])): xmin, ymin, xmax, ymax, conf = tuple (output[0 ][0 ][0 ][i].tolist()) if (conf > 0.4 ) : cls = int (output[1 ][0 ][0 ][0 ][i]) print ('class:' , cls, ', box:' ,output[0 ][0 ][0 ][i]) color = (255 , cls*10 , cls*100 ) draw.rectangle(((xmin/ width_scale, ymin/ height_scale), (xmax/ width_scale, ymax/ height_scale)), outline=color, width=2 ) img.show()
画框,引入了缩放比例,否则框的位置不对
1 2 3 4 5 6 7 8 9 from pathlib import Pathfrom IPython.display import Markdown as mdsubgraph_link =get_svg_path(output_dir) for sg in subgraph_link: hl_text = os.path.join(*Path(sg).parts[4 :]) sg_rel = os.path.join('../' , sg) display(md("[{}]({})" .format (hl_text,sg_rel)))
生成两个.svg网络可视化图的链接
1 2 3 4 5 6 7 8 9 10 11 12 13 14 15 16 17 EP_list = ['TIDLExecutionProvider' ,'CPUExecutionProvider' ] sess = rt.InferenceSession(onnx_model_path ,providers=EP_list, provider_options=[compile_options, {}], sess_options=so) input_details = sess.get_inputs() for i in range (5 ): output = list (sess.run(None , {input_details[0 ].name : preprocess('WYJ/dog.jpg' )})) from scripts.utils import plot_TI_performance_data, plot_TI_DDRBW_data, get_benchmark_outputstats = sess.get_TI_benchmark_data() fig, ax = plt.subplots(nrows=1 , ncols=1 , figsize=(10 ,5 )) plot_TI_performance_data(stats, axis=ax) plt.show() tt, st, rb, wb = get_benchmark_output(stats) print (f'Statistics : \n Inferences Per Second : {1000.0 /tt :7.2 f} fps' )print (f' Inference Time Per Image : {tt :7.2 f} ms \n DDR BW Per Image : {rb+ wb : 7.2 f} MB' )
推理,注意TIDLCompilationProvider和TIDLExecutionProvider的区别
Statistics :
Debug :
将custom-model-onnx 替换为自己的模型后报错,且内核经常挂掉,这不是服务器的问题,而是代码中有错误引发 Jupyter 中的某种内存分配问题并kill内核.(如,索引路径错误,模型不存在,config参数配置错误)—— E2E:Kills Kernel in Edge AI Studio
在My Workspace中, 右上角New > Terminal 可以打开终端,便于进一步的调试
prebuilt-models中的预训练模型每次重启EVM都要先重新解压:cd notebooks/prebuilt-models/8bits/find . -name "*.tar.gz" -exec tar --one-top-level -zxvf "{}" \;
内核频繁挂掉:重启EVM
4. 板端运行(TDA4VM-SK) 连接SK板进入minicom串口通讯传输模型文件(失败)(若能连网线通过jupyternotebook配置更方便,这里网络有限制所以配置都通过SD卡进行)
通过SD卡配置编译生成的模型,配置模型文件夹yolox放入modelzoo文件夹:
1
2
3
4
5
6
7
8
9
10
11
model_zoo/yolox/ ├── artifacts │ ├── allowedNode.txt │ ├── detslabels_tidl_io_1.bin │ ├── detslabels_tidl_net.bin │ └── onnxrtMetaData.txt ├── dataset.yaml ├── model │ ├── yolox_s_lite_640x640_20220221_model.onnx │ └── yolox_s_lite_640x640_20220221_model.prototxt └── param.yaml
通过SD卡配置object_detection.yaml,在model参数中索引上面建立的模型文件夹
1 2 3 4 5 6 sudo minicom -D /dev/ttyUSB2 -c on root cd /opt/edgeai-gst-apps/apps_cpp./bin/Release/app_edgeai ../configs/object_detection.yaml
修改app_edgeai(optional) 在opt\edgeai-gst-apps\apps_cpp\完成修改后重新make:
1 2 3 4 mkdir build && cd buildcmake .. make
5. 性能评估 Docs: Performance Visualization Tool ../perf_Logs/中生成 .md 格式的Performance Logs ,最多15个,运行时会不断覆写
也可以使用Perfstats tool, 把运行状态在terminal print:
1 2 3 4 5 6 7 cd /opt/edgeai-gst-apps/scripts/perf_statsmkdir build && cd buildcmake .. && make cd /opt/edgeai-gst-apps/scripts/perf_stats/build../bin/Release/perf_stats -l
此外,使用官方提供的可视化工具Visualization tool是最佳选择,但是要装Docker
Summary of CPU load
CPU
TOTAL LOAD %
mpu1_0
40.83
mcu2_0
7. 0
mcu2_1
1. 0
c6x_1
0. 0
c6x_2
1. 0
c7x_1
32. 0
HWA(Hardware Accelerator)
LOAD(Million Operations per second)
MSC0(Multiply and Accumulate)
6.94 % ( 42 MP/s )
MSC1
6.74 % ( 55 MP/s )
DDR BW
AVG
PEAK
READ BW
1509 MB/s
5713 MB/s
WRITE BW
721 MB/s
3643 MB/s
TOTAL BW
2230 MB/s
9356 MB/s
CPU: mcu2_0
TASK
TASK LOAD
IPC_RX
0.34 %
REMOTE_SRV
0.30 %
LOAD_TEST
0. 0 %
TIVX_CPU_0
0. 0 %
TIVX_V1NF
0. 0 %
TIVX_V1LDC1
0. 0 %
TIVX_V1SC1
3. 9 %
TIVX_V1MSC2
3.24 %
TIVXVVISS1
0. 0 %
TIVX_CAPT1
0. 0 %
TIVX_CAPT2
0. 0 %
TIVX_DISP1
0. 0 %
TIVX_DISP2
0. 0 %
TIVX_CSITX
0. 0 %
TIVX_CAPT3
0. 0 %
TIVX_CAPT4
0. 0 %
TIVX_CAPT5
0. 0 %
TIVX_CAPT6
0. 0 %
TIVX_CAPT7
0. 0 %
TIVX_CAPT8
0. 0 %
TIVX_DPM2M1
0. 0 %
TIVX_DPM2M2
0. 0 %
TIVX_DPM2M3
0. 0 %
TIVX_DPM2M4
0. 0 %
CPU Heap Table
HEAP
Size
Free
Unused
DDR_LOCAL_MEM
16777216 B
16768256 B
99 %
L3_MEM
262144 B
261888 B
99 %
CPU: mcu2_1
CPU: mcu2_1
TASK
TASK LOAD
IPC_RX
0. 0 %
REMOTE_SRV
0.18 %
LOAD_TEST
0. 0 %
TIVX_CPU_1
0. 0 %
TIVX_SDE
0. 0 %
TIVX_DOF
0. 0 %
IPC_TEST_RX
0. 0 %
IPC_TEST_TX
0. 0 %
IPC_TEST_TX
0. 0 %
IPC_TEST_TX
0. 0 %
IPC_TEST_TX
0. 0 %
IPC_TEST_TX
0. 0 %
CPU Heap Table
HEAP
Size
Free
Unused
DDR_LOCAL_MEM
16777216 B
16773376 B
99 %
L3_MEM
262144 B
262144 B
100 %
CPU: c6x_1
CPU: c6x_1
TASK
TASK LOAD
IPC_RX
0. 0 %
REMOTE_SRV
0. 0 %
LOAD_TEST
0. 0 %
TIVX_CPU
0. 0 %
IPC_TEST_RX
0. 0 %
IPC_TEST_TX
0. 0 %
IPC_TEST_TX
0. 0 %
IPC_TEST_TX
0. 0 %
IPC_TEST_TX
0. 0 %
IPC_TEST_TX
0. 0 %
CPU Heap Table
HEAP
Size
Free
Unused
DDR_LOCAL_MEM
16777216 B
16773376 B
99 %
L2_MEM
229376 B
229376 B
100 %
DDR_SCRATCH_MEM
50331648 B
50331648 B
100 %
CPU: c6x_2
CPU: c6x_2
TASK
TASK LOAD
IPC_RX
0. 0 %
REMOTE_SRV
0. 0 %
LOAD_TEST
0. 0 %
TIVX_CPU
0. 0 %
IPC_TEST_RX
0. 0 %
IPC_TEST_TX
0. 0 %
IPC_TEST_TX
0. 0 %
IPC_TEST_TX
0. 0 %
IPC_TEST_TX
0. 0 %
IPC_TEST_TX
0. 0 %
CPU Heap Table
HEAP
Size
Free
Unused
DDR_LOCAL_MEM
16777216 B
16773376 B
99 %
L2_MEM
229376 B
229376 B
100 %
DDR_SCRATCH_MEM
50331648 B
50331648 B
100 %
CPU: c7x_1
TASK
TASK LOAD
IPC_RX
0. 5 %
REMOTE_SRV
0. 1 %
LOAD_TEST
0. 0 %
TIVX_C71_P1
31.38 %
TIVX_C71_P2
0. 0 %
TIVX_C71_P3
0. 0 %
TIVX_C71_P4
0. 0 %
TIVX_C71_P5
0. 0 %
TIVX_C71_P6
0. 0 %
TIVX_C71_P7
0. 0 %
TIVX_C71_P8
0. 0 %
IPC_TEST_RX
0. 0 %
IPC_TEST_TX
0. 0 %
IPC_TEST_TX
0. 0 %
IPC_TEST_TX
0. 0 %
IPC_TEST_TX
0. 0 %
IPC_TEST_TX
0. 0 %
CPU Heap Table
HEAP
Size
Free
Unused
DDR_LOCAL_MEM
268435456 B
232984320 B
86 %
L3_MEM
8159232 B
0 B
0 %
L2_MEM
458752 B
458752 B
100 %
L1_MEM
16384 B
0 B
0 %
DDR_SCRATCH_MEM
385875968 B
367400145 B
95 %
PERF
avg (usecs)
min/max (usecs)
number of executions
33352
0 / 412578
9556
FPS
PERF
Frames per sec (FPS)
29.98
Temperature statistics
ZONE
TEMPERATURE
CPU
50.93 Celsius
WKUP
49.52 Celsius
C7X
51.86 Celsius
GPU
51.63 Celsius
R5F
50.93 Celsius
TDA4系列文章:TDA4①:SDK, TIDL, OpenVX TDA4②:环境搭建、模型转换、Demo及Tools TDA4③:YOLOX的模型转换与SK板端运行 TDA4④:部署自定义模型