0%

PaperLog:DMS-YOLOv8

论文《基于YOLOv8的驾驶员行为检测算法及其实现》日志, 项目地址:DMS-YOLOv8

该论文整体框架为之前两篇论文的整合:

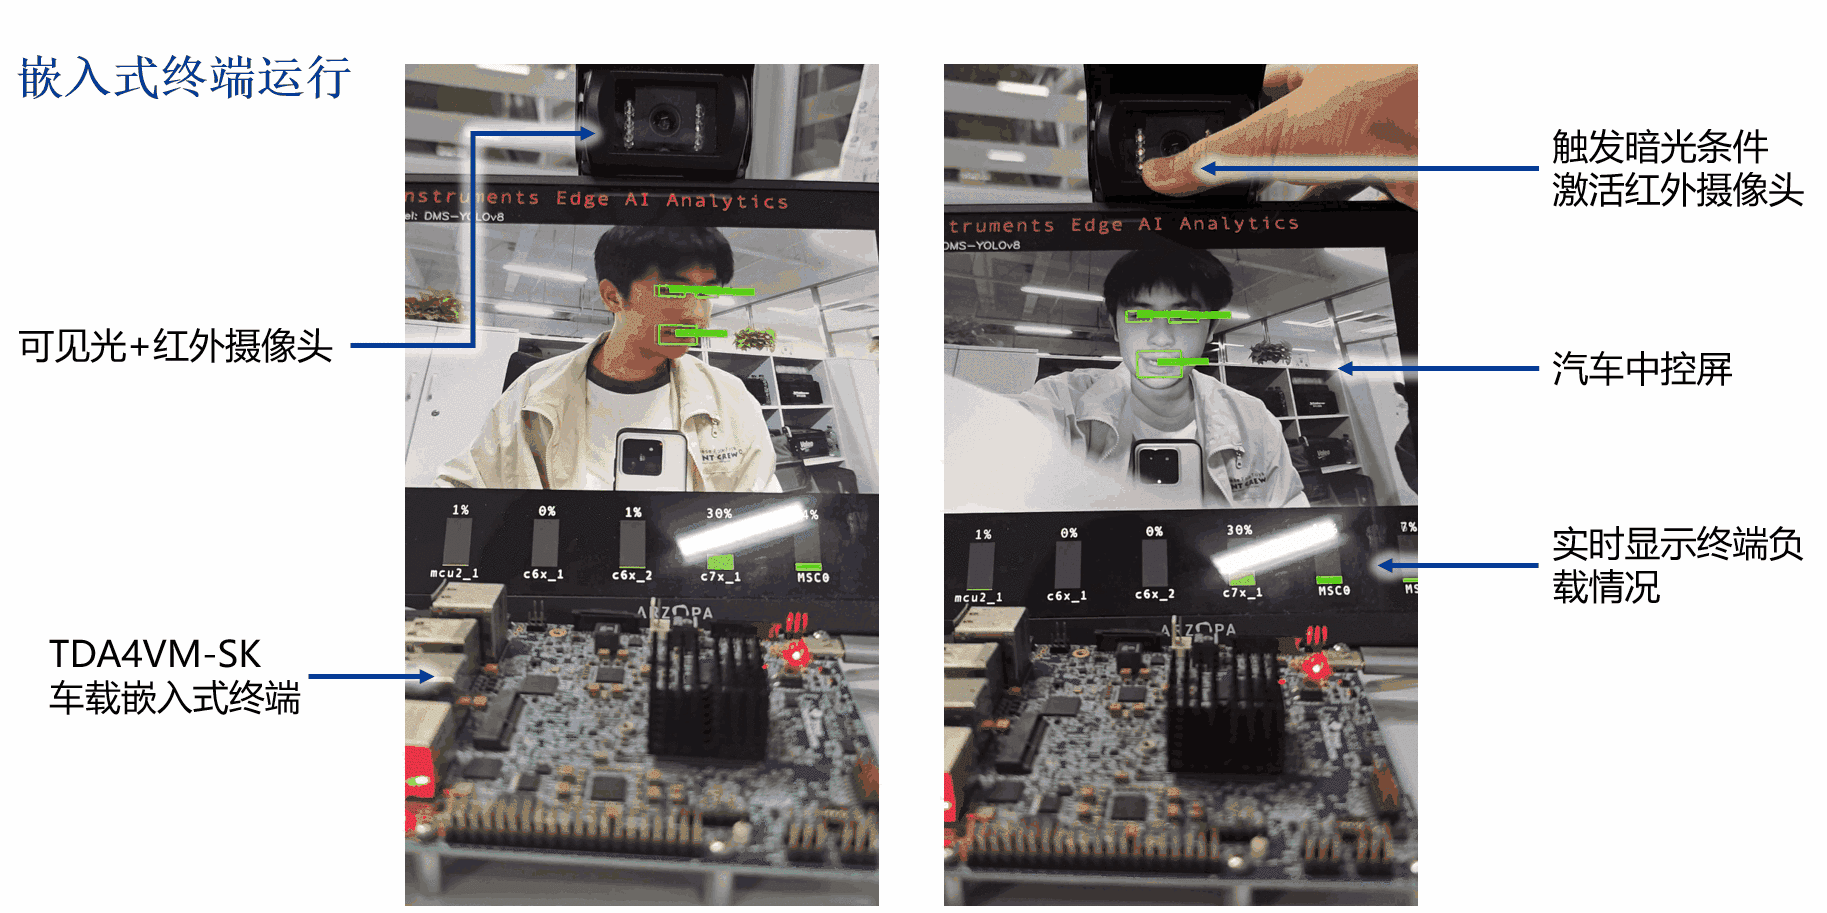
此外,加入算法部署实现部分,基于实习期间对TDA4的研究:

训练数据:exp
思维导图:论文框架


以下为开发日志(倒叙)

想法:
合并分心与疲劳检测算法

202403收尾

尝试部署原红外分心行为

1
2
3
4
"Danger",
"Drink",
"Phone",
"Safe",

失败,即使关了图像增强设置,best AP is 38.86

总结部署流程

1
2
3
4
5
6
7
8
9
10
11
12
13
14
15
16
17
18
19
20
21
22
23
24
25
26
27
28
29
30
31
32
33
34
35
36
37
38
39
40
41
42
43
44
45
46
47
48
49
50
#运行训练:
python -m yolox.tools.train -n yolox-s-ti-lite -d 0 -b 64 --fp16 -o --cache
#导出:
python3 tools/export_onnx.py --output-name yolox_s_ti_lite0.onnx -f exps/default/yolox_s_ti_lite.py -c YOLOX_outputs/yolox_s_ti_lite/best_ckpt.pth --export-det
#onnx推理:
python3 demo/ONNXRuntime/onnx_inference.py -m yolox_s_ti_lite0.onnx -i test.jpg -s 0.3 --input_shape 640,640 --export-det

#onnx拷贝到tool/models,/examples/osrt_python改model_configs的模型路径和类别数量
#tools根目录运行
./scripts/yolo_compile.sh
#模型结果在model-artifacts/模型名称

#挂载SD卡,model_zoo新建模型文件夹,拷贝模型
CEAM-YOLOv7/
├── artifacts
│   ├── allowedNode.txt
│   ├── detections_tidl_io_1.bin
│   ├── detections_tidl_net.bin
│   └── onnxrtMetaData.txt
├── dataset.yaml #改
├── model
│   └── yolox_s_ti_lite0.onnx
├── param.yaml #拷贝然后改
└── run.log

#dataset.yaml
categories:
- supercategory: distract
id: 1
name: cup
- supercategory: distract
id: 2
name: hand
- supercategory: distract
id: 3
name: phone
- supercategory: distract
id: 4
name: wheel

#param.yaml(copy from model_zoo_8220)
threshold: 0.2 #好像没用
model_path: model/yolox_s_ti_lite0.onnx

#rootfs/opt/edgeai-gst-apps/configs改yolo.yaml

#SD卡上板
sudo minicom -D /dev/ttyUSB2 -c on
#root登录,ctrl+A Z W换行,运行
cd /opt/edgeai-gst-apps/apps_cpp && ./bin/Release/app_edgeai ../configs/yolo.yaml

20240313重新部署

重建sk板,edgeai tidl tool 和 edge ai yolox环境 (要注意SK版本和tools版本对应!!!)

1
2
3
4
git clone https://github.com/TexasInstruments/edgeai-tidl-tools.git
git checkout 08_06_00_05
conda create -n ti python=3.6
...

混合分心与疲劳数据集, 一箭双雕,但是分心没红外

1
2
3
4
5
6
7
8
9
10
11
12
13
14
15
16
17
18
19
20
21
22
23
24
25
26
27
28
29
30
31
32
33
34
35
36
COCO_CLASSES = (
"closed_eye",
"closed_mouth",
"cup",
"hand",
"open_eye",
"open_mouth",
"phone",
"wheel",
)

categories:
- supercategory: Fatigue
id: 1
name: closed_eye
- supercategory: Fatigue
id: 2
name: closed_mouth
- supercategory: Distract
id: 3
name: cup
- supercategory: Distract
id: 4
name: hand
- supercategory: Fatigue
id: 5
name: open_eye
- supercategory: Fatigue
id: 6
name: open_mouth
- supercategory: Distract
id: 7
name: phone
- supercategory: Distract
id: 8
name: wheel

202312 分心行为算法

20231207

再换数据集试试,DriverSep 5k
图 4

1
2
3
4
5
6
COCO_CLASSES = (
"cup",
"hand",
"phone",
"wheel",
)
模型 数据 备注
yolox_s_ti_lite6 mAP=0.211:0.682 total_loss: 0.2 epoch=300 DriverSep数据集,关了数据增强效果一般
yolox_s_ti_lite7 mAP=0.739:0.971 total_loss: 1.8 epoch=300 开了数据增强效果拔群

202311 训练并部署模型至SK板

20231127-30 分心行为算法训练

图 2

State Farm Distracted Driver Detection 是否要把这个开源数据集加进来?但是视角有点偏

有标注好的:Modified distracted driver dataset(Mdd 5842→1w 12类)(不行,疑似标注方法问题,效果很差)

1
2
3
4
5
6
COCO_CLASSES = (
"closed_eye",
"closed_mouth",
"open_eye",
"open_mouth",
)

分心行为的标注框要不要调整?

训练:

1
2
3
4
5
python -m yolox.tools.train -n yolox-s-ti-lite -d 0 -b 64 --fp16 -o --cache

python3 tools/export_onnx.py --output-name demo_output/yolox_s_ti_lite5.onnx -f exps/default/yolox_s_ti_lite.py -c YOLOX_outputs/yolox_s_ti_lite5/best_ckpt.pth --export-det

python3 demo/ONNXRuntime/onnx_inference.py -m demo_output/yolox_s_ti_lite5.onnx -i test/test5.jpg -s 0.3 --input_shape 640,640 --export-det
模型 数据 备注
yolox_s_ti_lite0 mAP=0.68:0.96 total_loss: 2.3 epoch=300 仅可见光数据训练
yolox_s_ti_lite1 mAP=0.61:0.94 total_loss: 2.8 epoch=179 混合数据集,crop,效果一般
yolox_s_ti_lite2 mAP=0.554:0.928 total_loss: 9.1 epoch=80 仅旋转偏移,训练时间长占显存大,loss下降慢
yolox_s_ti_lite3 mAP=0.559:0.915 total_loss: 7.7 epoch=200 关闭混合精度,训了两天 用于中期部署展示⭐
yolox_s_ti_lite4 mAP=0.25:0.35 total_loss: 1.2 epoch=280 分心数据集3k,效果奇差,可能是少数据 或是yolox自带数据增强
yolox_s_ti_lite4_2 mAP=0.376:0.394 total_loss: 0.6 epoch=300 分心数据集3k,去除yolox的数据增强还是不行
yolox_s_ti_lite5 mAP=0.686:0.979 total_loss: 1.6 epoch=300 Mdd可见光数据集 10k 数据好看但是检测效果不行 部署效果更差
图 3

20231122 部署疲劳算法以备中期检查

图 2

yolox_s_ti_lite3
疲劳检测算法部署已基本搞定,之后搞分心行为

20231120-21 edgeai-yolox重新训练

yolox_s_ti_lite1部署的检测效果一般,可能是可见光+红外数据集使用了crop数据增强方法,而yolox又开了mosaic,导致面部特征被拆分的厉害,使用仅旋转+偏移的数据集重新训练并部署试试 yolox_s_ti_lite2

显存吃太多,取消混合精度训练 删掉 --fp16 -o
python -m yolox.tools.train -n yolox-s-ti-lite -d 0 -b 8 --cache
但是训练很慢

20231117 yolox_s_ti_lite部署成功

再次尝试转换生成的yolox_s_ti_lite0.onnx,模型配置改为:'scale' : [1,1,1]
成功!居然是scale配置错误

1
2
3
4
5
6
7
8
9
10
input_data.shape (1, 3, 640, 640)
output.shape: (1, 1, 200, 6) [array([[[[ 2.8528796e+02, 1.7602501e+02, 3.3061954e+02,
2.0805267e+02, 1.1221656e-01, 0.0000000e+00],
[ 3.0201743e+02, 2.8543573e+02, 3.7205356e+02,
3.2997461e+02, 8.0858791e-01, 1.0000000e+00],
[ 2.8855203e+02, 1.6997089e+02, 3.3278247e+02,
2.0731580e+02, 7.2682881e-01, 2.0000000e+00],
...,
[-1.0000000e+00, -1.0000000e+00, -1.0000000e+00,
dtype=float32)]
图 2

配置板端文件:

1
2
3
4
5
6
7
8
9
10
11
12
13
14
15
16
17
18
19
20
21
22
23
24
25
26
27
28
29
30
31
32
33
34
35
36
37
38
39
40
41
42
43
44
45
46
47
48
49
50
51
52
53
54
#运行配置文件opt/edgeai-gst-apps/yolo.yaml
title: "DMS"
log_level: 1
inputs:
input0:
source: /dev/video2
format: jpeg
width: 1920
height: 1080
framerate: 30
models:
model0:
model_path: /opt/model_zoo/DMS-YOLOv8
viz_threshold: 0.2
outputs:
output0:
sink: kmssink
width: 1920
height: 1080
overlay-performance: True
flows:
flow0: [input0,model0,output0,[200,120,1280,720]]

#模型文件夹DMS-YOLOv8
DMS-YOLOv8/
├── artifacts
│   ├── allowedNode.txt
│   ├── detections_tidl_io_1.bin
│   ├── detections_tidl_net.bin
│   └── onnxrtMetaData.txt
├── dataset.yaml #改
├── model
│   └── yolox_s_ti_lite0.onnx
├── param.yaml #改
└── run.log

#dataset.yaml
categories:
- supercategory: eye
id: 1
name: closed
- supercategory: mouth
id: 2
name: closed
- supercategory: eye
id: 3
name: open
- supercategory: mouth
id: 4
name: open

#param.yaml(copy from model_zoo_8220)
threshold: 0.2 #好像没用
model_path: model/yolox_s_ti_lite0.onnx

板端运行:

1
2
sudo minicom -D /dev/ttyUSB2 -c on
cd /opt/edgeai-gst-apps/apps_cpp && ./bin/Release/app_edgeai ../configs/yolo.yaml

成功!!
图 0

20231116 模型转换,yolox失败,yolov8 & FEY-YOLOX成功

1
2
3
4
5
6
7
8
9
10
11
12
13
14
15
16
17
18
19
20
21
22
23
24
25
26
27
28
29
30
31
32
33
34
35
36
37
38
39
40
41
#model_configs.py:
'yolox_s_lite' :{ # infer wrong
'model_path' : os.path.join(models_base_path, 'yolox_s_ti_lite0.onnx'),
'mean': [0, 0, 0],
'scale' : [0.003921568627,0.003921568627,0.003921568627],
'num_images' : numImages,
'num_classes': 4,
'model_type': 'od',
'od_type' : 'SSD',
'framework' : 'MMDetection',
'meta_layers_names_list' : os.path.join(models_base_path, 'yolox_s_ti_lite0.prototxt'),
'session_name' : 'onnxrt' ,
'meta_arch_type' : 6
},

#模型转换失败,输出全是-1
input_data.shape (1, 3, 640, 640)
output.shape: (1, 1, 200, 6) [array([[[[-1., -1., -1., -1., 0., -1.],
[-1., -1., -1., -1., 0., -1.],
[-1., -1., -1., -1., 0., -1.],
...,
[-1., -1., -1., -1., 0., -1.],
[-1., -1., -1., -1., 0., -1.],
[-1., -1., -1., -1., 0., -1.]]]], dtype=float32)]
#是图片没目标还是模型有问题?是否仍然可以部署?

#如果注释掉prototxt,或以分类模型形式转换,则报错:
onnxruntime.capi.onnxruntime_pybind11_state.Fail: [ONNXRuntimeError] : 1 : FAIL : This is an invalid model. Error: the graph is not acyclic.
#使用edgeai-yolox中的pretrained yolox-s-ti-lite_39p1_57p9同样报错

#使用modelZoo中的8220 yolox_s_lite_640x640则正常
input_data.shape (1, 3, 640, 640)
output.shape: (1, 1, 200, 5) [array([[[[ 46.72146 , 90.91087 , 548.1755 , 592.36487 ,
0.8415479],
[ -1. , -1. , -1. , -1. ,
0. ],
[ -1. , -1. , -1. , -1. ,
0. ],
......
#推理也有结果
#两者模型主干相同,头尾不同,输出shape最后一位不同

目前看来,edgeai-yolox训练得到的模型并不能直接转换(虽然它提供的export_onnx.py能导出prototxt) 可以转换,之前是参数配置问题
而modelZoo中的yolox经查应该是由edgeai_benchmark训练得到的,下次尝试

又回去尝试直接转10月训练的yolov8n_4aug(不使用prototxt),转换有输出output.shape: (1, 25200, 9))!!
但是无法直接infer,而且没有prototxtx后期如何部署?可能之后要手搓SK板中的代码

此外FEY-YOLOX也有shape相同的输出,今天进展不错,明天尝试这两个有输出的部署以及edgeai_benchmark yolox的训练

20231115 edgeai-yolox训练

edgeai-yolox

1
2
3
4
5
6
7
8
9
10
11
#训练:
python -m yolox.tools.train -n yolox-s-ti-lite -d 0 -b 8 --fp16 -o --cache
#使用疲劳驾驶数据集训练成功,pth=68.5MB

#导出:
python3 tools/export_onnx.py --output-name demo_output/yolox_s_ti_lite0.onnx -f exps/default/yolox_s_ti_lite.py -c YOLOX_outputs/yolox_s_ti_lite/best_ckpt.pth --export-det
#生成onnx(37.04MB)与prototxt

#onnx推理:
python3 demo/ONNXRuntime/onnx_inference.py -m demo_output/yolox_s_ti_lite0.onnx -i test.jpg -s 0.3 --input_shape 640,640 --export-det
#推理成功,检测出眼睛嘴巴,说明到onnx为止是ok的
图 2

YOLOX模型是ok的,与官方提供的预训练模型结构基本相同

20231113 尝试部署yolov8失败

尝试直接用edgeai-tools转换yolov8模型,失败
可能的原因:转换编译配置、SK板部署参数配置、模型结构不支持/输出不匹配
为排除模型问题,接下来先用yolox尝试


202310 算法变体 YOLOv7 → v8/X

20231031 降级X以便于部署

FEY-YOLOv7 → FEY-YOLOX
参考:用YOLOv5框架YOLOX
FEY-YOLOX也许能直接部署

20231017 升级v8以跟上时代

FEY-YOLOv7 → FEY-YOLOv8
YOLOv8_modules
图 1
参考网络结构,用modules搭积木

1
2
3
4
5
6
7
8
9
10
11
12
13
14
15
16
17
18
19
20
21
22
23
24
25
26
27
28
29
30
31
32
33
34
35
36
37
38
39
40
41
42
43
44
45
46
47
48
49
50
51
52
53
54
55
56
57
58
59
60
61
#YOLOv8.yaml
# parameters
nc: 4 # number of classes
depth_multiple: 0.33 # model depth multiple
width_multiple: 0.25 # layer channel multiple
# scales: # model compound scaling constants, i.e. 'model=yolov8n.yaml' will call yolov8.yaml with scale 'n'
# # [depth, width, max_channels]
# n: [0.33, 0.25, 1024] # YOLOv8n summary: 225 layers, 3157200 parameters, 3157184 gradients, 8.9 GFLOPs
# s: [0.33, 0.50, 1024] # YOLOv8s summary: 225 layers, 11166560 parameters, 11166544 gradients, 28.8 GFLOPs
# m: [0.67, 0.75, 768] # YOLOv8m summary: 295 layers, 25902640 parameters, 25902624 gradients, 79.3 GFLOPs
# l: [1.00, 1.00, 512] # YOLOv8l summary: 365 layers, 43691520 parameters, 43691504 gradients, 165.7 GFLOPs
# x: [1.00, 1.25, 512] # YOLOv8x summary: 365 layers, 68229648 parameters, 68229632 gradients, 258.5 GFLOPs
# # depth_multiple:0.33 用来控制模型的深度,仅在repeats≠1时启用
# # width_multiple:0.25 用来控制模型的宽度,主要做哟关于args中的ch_out
# # 如第一个卷积层,ch_out=64,那么在v8n实际运算过程中,会将卷积过程中的卷积核设为64x0.25,所以会输出16通道的特征图

# anchors
anchors:
# - [10,13, 16,30, 33,23] # P3/8
# - [30,61, 62,45, 59,119] # P4/16
# - [116,90, 156,198, 373,326] # P5/32
- [5,6, 8,14, 15,11]
- [10,13, 16,30, 33,23] # P3/8
- [30,61, 62,45, 59,119] # P4/16

# - [116,90, 156,198, 373,326] # P5/32

# YOLOv7-tiny backbone
backbone:
# [from, number, module, args]
[[-1, 1, Conv, [64, 3, 2]], # 0-P1/2 得到特征图大小的一半
[-1, 1, Conv, [128, 3, 2]], # 1-P2/4
[-1, 3, C2f, [128, True]],
[-1, 1, Conv, [256, 3, 2]], # 3-P3/8
[-1, 6, C2f, [256, True]],
[-1, 1, Conv, [512, 3, 2]], # 5-P4/16
[-1, 6, C2f, [512, True]],
[-1, 1, Conv, [1024, 3, 2]], # 7-P5/32
[-1, 3, C2f, [1024, True]],
[-1, 1, SPPF, [1024, 5]], # 9
]
# YOLOv8.0n head
head:
[[-1, 1, nn.Upsample, [None, 2, 'nearest']],
[[-1, 6], 1, Concat, [1]], # cat backbone P4
[-1, 3, C2f, [512]], # 12

[-1, 1, nn.Upsample, [None, 2, 'nearest']],
[[-1, 4], 1, Concat, [1]], # cat backbone P3
[-1, 3, C2f, [256]], # 15 (P3/8-small)

[-1, 1, Conv, [256, 3, 2]],
[[-1, 12], 1, Concat, [1]], # cat head P4
[-1, 3, C2f, [512]], # 18 (P4/16-medium)

[-1, 1, Conv, [512, 3, 2]],
[[-1, 9], 1, Concat, [1]], # cat head P5
[-1, 3, C2f, [1024]], # 21 (P5/32-large)

[[15, 18, 21], 1, Detect, [nc, anchors]], # Detect(P3, P4, P5)
]

主要步骤:
在models/common.py中加入新模块:C2f(注释掉原C2f),并在yolo.py中导入, 用原模块好像也一样;暂未修改检测头和Anchor-free
使用疲劳驾驶数据集检测,效果很好√